afishinado
Moderator
Staff member
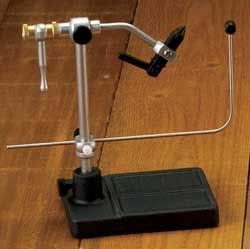
I started tying with a Thomson stationary vise a long time ago. It did the job, but I eventually graduated to a Regal vise. That worked well for a few years, until I stopped into my local fly shop and watched someone tie on a Renzetti rotary vise. I tried it in the store and bought a Renzetti Traveler that day. Since then, I’ve tied thousands of flies on the Renzetti from 3/0 saltwater to size 30 midges, and have never looked back.
There are things that can be done better and easier on a rotary vise. I believe tying with a rotary can improve the appearance of your flies and make dubbing, ribbing, palmering and hackling easier, and quicker in some cases.
For example, a common problem is the hackle feather twists when you tying a traditional Catskill fly or palmer hackle on a wooly bugger or EHC. On a stationary vise you must use the wrap over, hand off, and wrap under method, which often causes the hackle to twist during the hand-off or wrap-under. This problem is virtually eliminated on a rotary since you can hold and maintain tension on the hackle feather and keep it perpendicular to the body while rotating the fly. You don’t lose sight of the hackle or lose tension on the feather as the fly is rotated. In the case of palmering, maintaining an angle while rotating makes the spacing of the hackle near perfect every time.
When dubbing on a stationary vise, you must dub a short noodle on the thread, wrap around and dub the thread again and again. The noodle must remain short since you need enough clearance to wrap the dubbing and bobbin over and around. When dubbing on a rotary, you can dub an extra long noodle on your thread, let it hang off the table and rotate the fly to dub the entire body while maintaining even tension, and without having to reapply more dubbing to the thread. Also, when tying on a rotary, you are able to the see the fly 360 degrees as you rotate with no blind spot in the back.
Ribbing a fly is also simplified on a rotary. You simply grab the ribbing material, hold it at the proper angle, maintain tension and rotate the fly. The spacing is perfect when the angle is maintained, and again you get to see the fly as it is wrapped 360 degrees. Same as above when tying a chenille or other similar type body material.
If you tie any flies with epoxy or the new quick setting UV stuff, a rotary is just what you need. The fly stays parallel in the vise while you rotate it to apply the goop evenly, grab your UV light, and rotate the fly a few times until it sets up.
Another advantage of a rotary vise is the bobbin cradle can be used to keep the thread and bobbin out of your way when performing certain tying steps.
I love my Renzetti Rotary. I've tied many thousands of flies on it in the 20+ years I've owned it. The vise still performs today as well as the day I bought it. I would consider this vise a 5 star purchase, but there are other quality rotary vises out there.
My whole point of this post is to let fellow tyers know that the rotary function has some function, if you choose to use it. Good luck.