You are using an out of date browser. It may not display this or other websites correctly.
You should upgrade or use an alternative browser.
You should upgrade or use an alternative browser.
Modest Pickerel patterns
- Thread starter Baron
- Start date
Baron
Active member
- Joined
- Apr 13, 2020
- Messages
- 1,548
Fredrick wrote:
I have had great sucess with clousers tied with super hair on a 60 degree jig hook .
I bet you catch allot in pursuit of your Heads!
can you show us all a photo of what you're talking about as I'd like to catch more. Others may want to see to know what not to tie as they want to catch less pickerel.
Super Hair? 60 degree jig hooK?
-
-
-
-
-
-
OopS, No need I look it up. Do you have directions to list?
Bamboozle
Well-known member
Those worms are pretty neutral and barely sink, hence my use of added weight. The tails are made of sheet foam and help the tail to rise up like a real plastic worm. They are unnecessary except if you desire that effect or like the look.Baron wrote:
I like the flies shown but would be afraid to add the tail shown......afraid the fish would laugh.
Whirlpool, on the forum that kicked me off, said that the leaded line I took off an old Medalist would help in many different ways when tying and and in need of weight. It sounded reasonable. The lake I fish most is terrible for weeds and until the milfoil collapses to the bottom standard streamers are off the menu. They either have to be weedless or float or both.
Since the deepest I desire to fish is 4' deep in a 6' deep lake neutral buoyancy is the best.
They would last about two pickerel...
Lead core line can be made into nice little "sink tips" for lack of a better name. Cut a length (which obviously will effect how heavy it is) and "whip" a small loop into each end using tying thread. Put some head cement of the thread to protect the wraps.
Using a loop-to-loop connection you can place it BEFORE your leader to sink the end of your fly line and the leader (keeping in mind you want to be using a short leader. Or you can place it 6" or so in front of the fly.
It casts pretty well and is an easy way to get your line down to moderate depths without buying a sink tip or full sinking line.
Baron
Active member
- Joined
- Apr 13, 2020
- Messages
- 1,548
I was wondering which way to employ it. I thought the guy said It could be used for the tie. I thought it could be wrapped around the torso for a slight negative buoyancy. However I like the the idea of a 6" bite tippet. My line was broken once one of yesterdays Pickerel came aboard. So it was lucky I even got it in the boat I guess.
I should have everything by early next week and can then start working on these.
What color should I start with?
I should have everything by early next week and can then start working on these.
What color should I start with?
Bamboozle
Well-known member
First off, lead core is probably too thick for a "bite tippet." For that I use multi-stranded coated wire specifically made for fishing. If you buy pre-made wire leaders (which don't need to be long), they have a swivel & snap on them which will give you all the weight you need.Baron wrote:
I was wondering which way to employ it. I thought the guy said It could be used for the tie. I thought it could be wrapped around the torso for a slight negative buoyancy. However I like the the idea of a 6" bite tippet. My line was broken once one of yesterdays Pickerel came aboard. So it was lucky I even got it in the boat I guess.
I should have everything by early next week and can then start working on these.
What color should I start with?
Lead core also isn't the best choice for weighting flies. For that you can buy lead wire which would be thinner because it isn't coated.
Colors...watermelon or what we bass guys call pumpkin, yellow, chartreuse and plain white.

Baron wrote:
https://www.google.com/url?sa=t&rct=j&q=&esrc=s&source=web&cd=&cad=rja&uact=8&ved=2ahUKEwigsqfMq_XrAhV2knIEHd1OAwYQuAIwAHoECAUQBA&url=https%3A%2F%2Fwww.youtube.com%2Fwatch%3Fv%3DhpvZp-L0-NY&usg=AOvVaw3hFoHf4F0wHuJSvjujHvc0
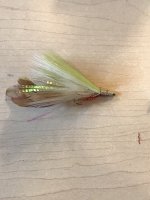
^ that's a really nice pattern. Not too difficult, uses easy to find and inexpensive materials, and should fish well.
As a beginning tyer, just keep reminding your self > MAINTAIN FIRM THREAD TENSION! Good luck.
Baron
Active member
- Joined
- Apr 13, 2020
- Messages
- 1,548

Baron wrote:
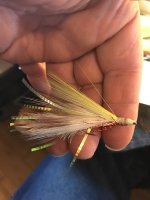
I can see its really easy to use to much bucktail.
Nice for your first fly.
As far as how much material to use, a rule of thumb is to grab as much as you think you need and divide it by two.
As you tie a few flies of the same pattern you hone in on the correct amount of materials, the correct proportions for the fly and your technique and proficiency both improve and progress with each fly you tie.
Keep tying the same pattern, don't jump around tying different flies until you have that pattern nailed down.
Mastering the techniques to tie one pattern is one building block that can be used to tie many other patterns. You progress by accumulating more and more building blocks. The same can be said for fly-fishing itself.
Good luck.
coyoterahn
Well-known member
You got a good start Baron, keep it up. Afish provided some wise guidance.
Bamboozle
Well-known member
Some folks have good luck with markers, others don't. I'm in the "don't" camp.
Permanent markers are far from permanent depending on what you apply them to. Natural fibers are sort of OK, but not so good on some synthetics. They can also bleed into places you don't want them to.
Also, many things can cause fading, smearing or dissolving like acids and oils on you skin and various fly treatments.
Many thousands of years ago I use to carry around high quality colored markers to color flies as needed which was all the rage back then. I always ended up with olive colored fingers and the maker got all over everything if I treated my fly with floatant.
I don't bother with markers any more and prefer colorfast materials, but that's me.
YMMV
Bamboozle
Well-known member
This ^^^^^ in spades!!afishinado wrote:
Keep tying the same pattern, don't jump around tying different flies until you have that pattern nailed down.
Mastering the techniques to tie one pattern is one building block that can be used to tie many other patterns. You progress by accumulating more and more building blocks. The same can be said for fly-fishing itself.
Good luck.
The best thing I ever did to improve my tying was to stop making two or three of a pattern and instead, FORCING myself to tie a minimum of 12, (you could try 6).
It's no secret that for most folks who don't tie professionally or all the time, the first one or two flies of any new pattern look like crap, but after about 4 or 5 they look pretty good. If you only tie one or two of this or that, EVERYTHING can look like crap! ;-)
The other suggestion I can offer is to PRACTICE new techniques repeatedly before trying them out on flies you intend to keep.
For example, wings of any type can give tiers fits, but unfortunately, they often are the next to last step in tying a fly. That means a lousy looking wing accompanies your beautifully wrapped body.
So, if hair wings are your Kryptonite, practice tying on a hair wing to a bare hook shank a bunch of times over & over again until the proportions and technique become second nature. Cut off your practice effort between attempts and when you think you got it, THEN try it out on a fly.
I do this ALL the time when learning something new in fly tying, (split tails, married wings, quill wings, parachute posts, for example). It is analogous to rehearsing a piece of music before a performance versus just playing it and hoping you don’t screw up.
For me it pays dividends in making my flies consistent and shouldn’t be looked upon as a waste of time or materials if nice looking, and well-constructed flies matter to you.