You are using an out of date browser. It may not display this or other websites correctly.
You should upgrade or use an alternative browser.
You should upgrade or use an alternative browser.
K
kbobb
Active member
- Joined
- May 24, 2011
- Messages
- 444
I personally would not use superglue to hold on SFG when wrapping - how would you move them if mis-aligned?
I have used all the methods listed and for ME the best and easiest is elastic thread - you can get it at Joann fabric stores. make a couple wraps near the ring end of the guide foot and it holds the foot fast til your wrapping thread reaches it - then just pull it off and use it on the next guide. About 3 or 4 inches of elastic thread is plenty cause it stretches when you pull it tight on the guide foot. Check out some of the rod building forums for more details.
I have used all the methods listed and for ME the best and easiest is elastic thread - you can get it at Joann fabric stores. make a couple wraps near the ring end of the guide foot and it holds the foot fast til your wrapping thread reaches it - then just pull it off and use it on the next guide. About 3 or 4 inches of elastic thread is plenty cause it stretches when you pull it tight on the guide foot. Check out some of the rod building forums for more details.
6xAdams(Jones)
Well-known member
Makes sense. I'll give it a try and just a touch with the razor should pop it right off. Apparently, part of my problem was wrapping so tightly, I couldn't shift the guide without un-wrapping.I personally would not use superglue to hold on SFG when wrapping - how would you move them if mis-aligned?
I have used all the methods listed and for ME the best and easiest is elastic thread - you can get it at Joann fabric stores. make a couple wraps near the ring end of the guide foot and it holds the foot fast til your wrapping thread reaches it - then just pull it off and use it on the next guide. About 3 or 4 inches of elastic thread is plenty cause it stretches when you pull it tight on the guide foot. Check out some of the rod building forums for more details.
jeffroey
Well-known member
- Joined
- Feb 15, 2019
- Messages
- 297
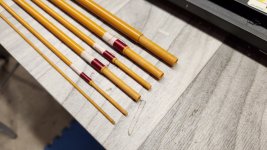
Current project on the bench is a good example of what I mean. I'm building a 6 pc pack rod using two identical vintage Lamiglas one-piece honey blanks. One blank is sectioned as the travel rod itself and the other is sacrificed and acts as the spigot stock.By "taper match spigot stick" do you mean you cut down sections for reference, or do you measure with a caliper?
By using two blanks this way with the same taper, my spigot fits will be a direct match ID to OD and I don't need to worry too much about spigot alignment when glueing them in place or proper fit when assembling sections and fishing.
Finding one-piece Lami Honey fly blanks isn't easy these days. Finding two with identical tapers is that much harder and I expect there will be glass fans reading this and asking why the hell didn't I just build out both of them (answer BTW is since Lami's 6 pc Brush Creek pack rods are so good they never come to the secondary market, I decided to build my own).
My point with the Rainshadows was I'm part of the camp that thinks they're some of the best value glass blanks out there and if your rod making journey takes you into sectioning and spigoting, these are the blanks you want to learn on. Mistakes are relatively cheap.
Attachments
fritzer
New member
- Joined
- Jun 18, 2018
- Messages
- 23
Highly recommend …………https://www.hookhack.com/
The Hook & Hackle Company
427 W. Main Street
Carnegie, PA 15106
Staff is the best!
The Hook & Hackle Company
427 W. Main Street
Carnegie, PA 15106
Staff is the best!
6xAdams(Jones)
Well-known member
I agree. I wound up finding the blank I wanted there since other outlets seemed to be having supply-chain problems. I was really surprised when an actual person answered the phone.Highly recommend …………https://www.hookhack.com/
The Hook & Hackle Company
427 W. Main Street
Carnegie, PA 15106
Staff is the best!
6xAdams(Jones)
Well-known member
Good morning,
I wanted to update this thread (the part that I hijacked) to let you know your advice worked during my latest building attempt.
The low-melt adhesive provided in a kit I purchased hardly helped, if it even helped at all. I think it's meant for really large guides anyway and it was fairly easy to scrape off. I DID NOT use superglue as I had suggested to myself. I was able to find the right tension to hold the guides, while still allowing them to be shifted to align with each other. Filing the guide foot to a shallower angle helped as well. Mostly, I was able to use part of my son's vast supply of Silly Bands (anyone remember those) and a spare thread spool to hold the single foot guides in place (one end of the band around one end of the spool, band around the rod, other end of the band around the other end of the spool). If wrapping moved the guide up the rod, I made a masking tape dam, which along with the rubber band, kept it from moving.
Thanks again for your advice. This is turning out to be very enjoyable.
- Glenn
PennKev
Well-known member
- Joined
- Sep 9, 2006
- Messages
- 3,299
That's pretty clever and as good of a solution as any to that problem.I made a masking tape dam, which along with the rubber band, kept it from moving.
6xAdams(Jones)
Well-known member
Masking tape is the duct tape of rod building. I wonder what is the WD-40 of rod building?That's pretty clever and as good of a solution as any to that problem.
")
JerryC
Active member
- Joined
- Feb 19, 2014
- Messages
- 524
I use single foot guides on my fly rods, but rather than fly rod specific single foot guides, I use single foot spinning guides. Since they keep the line off the blank they do help in shooting the line. It doesn't make for a traditional looking fly rod. This one of my 8 wgt rods.- Is there a reference that crosses snake guide sizes to single foot guide (ring) sizes? None of us have ever used rods with snake guides, so I won't be using them. Jann's and other suppliers don't state a size on their single foot guides - only fractional inches of the bore size. I did find one reference that suggested using guides of all the same size between the tip and stripping guide, stating that shooting line wouldn't encounter as many "directional changes."
- I suppose a better question would be, what is the optimum guide size for a given line weight?
- Is attaching a fighting butt to the back of a heavier (8 wt) nine-footer worth the trouble? I don't have one on my 9-foot 5/6 weight and I've never needed it. The youngest wants to use big streamers to catch big fish on the 8-weight and I'm guessing it might help the balance.
It does have a fighting butt on it. If you do decide on to install a fighting butt, which isn't a bad idea on an 8 wgt, do not install a permanent one. You can pick up a kit for plug in or screw in fighting butt. Installing the base is no different than installing a regular butt cap on a fly rod. All my 6 wgts and 8 wgts have them.
6xAdams(Jones)
Well-known member
The one I'm working on is an 8 wt and the kit from H&H included the fighting butt. It's on by friction except for the small amount of epoxy that may have oozed out of the reel seat. I don't expect it to need removal before other parts of the rod need repair or replacement. My father-in-law uses Fuji guides from Jann's that are less "traditional" than the guides that were put onto this one.It does have a fighting butt on it. If you do decide on to install a fighting butt, which isn't a bad idea on an 8 wgt, do not install a permanent one. You can pick up a kit for plug in or screw in fighting butt. Installing the base is no different than installing a regular butt cap on a fly rod. All my 6 wgts and 8 wgts have them.
JerryC
Active member
- Joined
- Feb 19, 2014
- Messages
- 524
If you already have it on, no sense in taking it off. Keep the fighting butt kit in mind in case you build another rod you want to put the fighting butt on. I probably use the same guides your father-in-law uses. I use the Fuji SIC guides and most likely got them from Jann's.The one I'm working on is an 8 wt and the kit from H&H included the fighting butt. It's on by friction except for the small amount of epoxy that may have oozed out of the reel seat. I don't expect it to need removal before other parts of the rod need repair or replacement. My father-in-law uses Fuji guides from Jann's that are less "traditional" than the guides that were put onto this one.
Shawn Joseph
Active member
PennKev
Well-known member
- Joined
- Sep 9, 2006
- Messages
- 3,299
The locking nut/hood appears to be upside down. Have you put a reel on there and checked that it works in that orientation?View attachment 1641230970First rod build started today. Got everything from proof fly fishing. 4 piece 9’ 8wt, with 7” full wells grip, Payne style up locking reel seat with carbon fiber insert fighting butt and snake guides in chrome. Going to do the guide spacing tomorrow and hopefully start wrapping. Used a little too much epoxy, which I knew I would bc I have no experience until today. No biggy I cleaned it off with paper towel. Now I have a better idea on how much less to use for the next build😆. Took my time marking everything so I didn’t screw it up lol. Excited for the next part of the build.
K
kbobb
Active member
- Joined
- May 24, 2011
- Messages
- 444
Agree - see image at proof website: https://www.proofflyfishing.com/products/payne-style-up-locking-reel-seat-with-bamboo-insertThe locking nut/hood appears to be upside down. Have you put a reel on there and checked that it works in that orientation?
TimMurphy
Well-known member
- Joined
- Sep 9, 2006
- Messages
- 2,863
Dear Board,
I've read this thread with interest. I have an old yellow Fenwick 6'9" spinning rod blank from the 1960's or early 1970's that I'd like to build with a cork handle and Tennessee rings like the one my buddy built and let me fish with well over 30 years ago.
I realize that is sacrilegious talk on a fly-fishing board, but I what I would really like to know if there is a good tutorial website for new rod builders that anyone would recommend? I have a graphite bass casting rod to build for practice before i ruin the Fenwick, but I need to know more about what I actually need to build a rod.
Regards,
Tim Murphy
Shawn Joseph
Active member
I put it on wrong lol. Won’t make that mistake again. So how do I fix it? Can I heat it up the fighting butt?
K
kbobb
Active member
- Joined
- May 24, 2011
- Messages
- 444
Mudhole and Matt Steffan (? spelling) have videos about casting and spinning rod building on you tube. Also I've found mudhole to be helpful on the phone - I tell them what I'd like to build and they tell me what parts I need - there are way more reel seat and grip parts for those type of rods than for fly rods. Hope that gets you started.Dear Board,
I've read this thread with interest. I have an old yellow Fenwick 6'9" spinning rod blank from the 1960's or early 1970's that I'd like to build with a cork handle and Tennessee rings like the one my buddy built and let me fish with well over 30 years ago.
I realize that is sacrilegious talk on a fly-fishing board, but I what I would really like to know if there is a good tutorial website for new rod builders that anyone would recommend? I have a graphite bass casting rod to build for practice before i ruin the Fenwick, but I need to know more about what I actually need to build a rod.
Regards,
Tim Murphy
K
kbobb
Active member
- Joined
- May 24, 2011
- Messages
- 444
If it works as is I'd probably leave it alone. Having the knurled part to the rear would likely make it easier to grip when taking the reel on or off.I put it on wrong lol. Won’t make that mistake again. So how do I fix it? Can I heat it up the fighting butt?
Can you get the fighting butt off without ruining it? Then it should be easy to reverse the ring.
You are not the first person to put something on backward (or leave a ring completely off! Don't ask how I know.)
Shawn Joseph
Active member
I’m all good buying a new fighting butt. Just want to know how to properly get it off or get it off and salvaging it if possible? If not, ok. Rookie mistake lol.If it works as is I'd probably leave it alone. Having the knurled part to the rear would likely make it easier to grip when taking the reel on or off.
Can you get the fighting butt off without ruining it? Then it should be easy to reverse the ring.
You are not the first person to put something on backward (or leave a ring completely off! Don't ask how I know.)
Latest posts
-
E
-

-
-

-
HDoes anyone know if it’s viable to raise a trout streams PH?
- Latest: HoboWithAFlyRod


