MathFish
Member
- Joined
- Jun 30, 2015
- Messages
- 181
So… Given that we are having our current cold snap and that I have the day off and fishing is out of the question for me, I decided to make another trout pinewood derby car. This time I made a California Golden Trout car. Also, the request from tracker12 to explain how I make the cars, I decided to take some photos along the way and explain how I make these silly cars…
I start with a Boy Scouts of America official pinewood derby car kit. I trace the block of wood onto a sheet of paper marking where the axles are for the wheels. Next I sketch the shape of the trout onto the paper being mindful of where the axles are located because the BSA rules dictate that the wheels must be attached to the block using the precut axle locations. This necessitates that the trout have an odd shape for the head (at least it does for the way that I go about doing this…). I also have to include an extended section of wood near the tail of the fish so that the axle can be accommodated.


After I have transferred the lines from my paper sketch onto the block of wood, it’s off to the scroll saw. I was fortunate enough to find a scroll saw with its own stand on the side of the road with a “Free to good home” sign on it this past December, before having this scroll saw, I used a coping saw and cut the design out by hand. The scroll saw has made the cutting process way easier…
I make some cuts on the side of the block for the dorsal fin, anal fin and the axle supports near the tail, then I flip the block on its side and cut out the curve of the fish shape. After I cut the curve out, I tape the “scrap” piece back onto the block using painters tape so that I can complete the cutting to get the head shape, the tail and all of the fins cut.


Once I am finished with the scroll saw, I use an orbital palm sander with course grit sand paper to form the curves near the head and fins and I get the rough edges from the cuts knocked down with this too. After I feel that I have gotten the fish shaped as much as I can with the orbital palm sander, I use some rasps and sand paper (60 grit, 150 grit, and finally 220 grit) to get the shape finalized and to smooth the fish so that I can begin to paint it.


Once the sanding is done, I use photos of the trout that I am trying to paint to help guide me on mixing the colors I will need and to help me determine the placement of the markings that I need to paint onto the block. I have used my IPhone to find photos and I have it next to me as I am painting the fish. I use cheap water-based acrylic paint from a craft store and I use cheap paint brushes as well and I just try to pull off the paint scheme as best as I can… I am a self-taught artist, I just figure, if I can pull off what I am trying to do – then great, if I can’t – then, oh well, at least I tried…
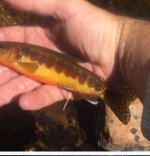
For this latest installment to my trout car garage, I used a photo of a California Golden Trout as my main model for the paint scheme. Having never seen one of these trout in person, I had to just go by the photos that I found online.
To begin painting, I decided to lay down a base coat of yellow over the wood.


Then I mixed an olive green with some sandy brown to make the greenish coloration of the top part of the trout. Afterward, I mixed the greenish color with some dark blue to make the color that I was going to use for the parr markings. I watered down this new color so that it would show the yellow through the parr marks…


Next, I decided to paint the gill plate edges, the mouth and the eye.

Afterward, I added on the red markings that were on the gill plate and along the lateral line of the fish.

And then I finished by painting the orange-ish coloration that is on the belly of the trout. I followed this up by painting in the pectoral fin by the gills and the rest of the fins on the underside of the fish. I then painted some lines along the dorsal fins and the tail. After that, I painted in the black spots along the tail and dorsal fin. Next was the black spots that are concentrated near the tail and the sparse patter of spots near the head. I finished up by painting in the lateral line last…
Here is the final paint scheme of the fish. I am pleased with how it turned out.


I sat down to start working on this at 8:30 this morning and I put the last bit of paint on it by 12:45… Now I need to get a good coat of lacquer on it and add the wheels…
I’ll post the final photos later tonight if I am able to finish it today.
Thanks for the question tracker12, I wasn’t sure what I was going to do today, and your question gave me a good reason to make another car...
I start with a Boy Scouts of America official pinewood derby car kit. I trace the block of wood onto a sheet of paper marking where the axles are for the wheels. Next I sketch the shape of the trout onto the paper being mindful of where the axles are located because the BSA rules dictate that the wheels must be attached to the block using the precut axle locations. This necessitates that the trout have an odd shape for the head (at least it does for the way that I go about doing this…). I also have to include an extended section of wood near the tail of the fish so that the axle can be accommodated.
After I have transferred the lines from my paper sketch onto the block of wood, it’s off to the scroll saw. I was fortunate enough to find a scroll saw with its own stand on the side of the road with a “Free to good home” sign on it this past December, before having this scroll saw, I used a coping saw and cut the design out by hand. The scroll saw has made the cutting process way easier…
I make some cuts on the side of the block for the dorsal fin, anal fin and the axle supports near the tail, then I flip the block on its side and cut out the curve of the fish shape. After I cut the curve out, I tape the “scrap” piece back onto the block using painters tape so that I can complete the cutting to get the head shape, the tail and all of the fins cut.
Once I am finished with the scroll saw, I use an orbital palm sander with course grit sand paper to form the curves near the head and fins and I get the rough edges from the cuts knocked down with this too. After I feel that I have gotten the fish shaped as much as I can with the orbital palm sander, I use some rasps and sand paper (60 grit, 150 grit, and finally 220 grit) to get the shape finalized and to smooth the fish so that I can begin to paint it.
Once the sanding is done, I use photos of the trout that I am trying to paint to help guide me on mixing the colors I will need and to help me determine the placement of the markings that I need to paint onto the block. I have used my IPhone to find photos and I have it next to me as I am painting the fish. I use cheap water-based acrylic paint from a craft store and I use cheap paint brushes as well and I just try to pull off the paint scheme as best as I can… I am a self-taught artist, I just figure, if I can pull off what I am trying to do – then great, if I can’t – then, oh well, at least I tried…
For this latest installment to my trout car garage, I used a photo of a California Golden Trout as my main model for the paint scheme. Having never seen one of these trout in person, I had to just go by the photos that I found online.
To begin painting, I decided to lay down a base coat of yellow over the wood.
Then I mixed an olive green with some sandy brown to make the greenish coloration of the top part of the trout. Afterward, I mixed the greenish color with some dark blue to make the color that I was going to use for the parr markings. I watered down this new color so that it would show the yellow through the parr marks…
Next, I decided to paint the gill plate edges, the mouth and the eye.
Afterward, I added on the red markings that were on the gill plate and along the lateral line of the fish.
And then I finished by painting the orange-ish coloration that is on the belly of the trout. I followed this up by painting in the pectoral fin by the gills and the rest of the fins on the underside of the fish. I then painted some lines along the dorsal fins and the tail. After that, I painted in the black spots along the tail and dorsal fin. Next was the black spots that are concentrated near the tail and the sparse patter of spots near the head. I finished up by painting in the lateral line last…
Here is the final paint scheme of the fish. I am pleased with how it turned out.
I sat down to start working on this at 8:30 this morning and I put the last bit of paint on it by 12:45… Now I need to get a good coat of lacquer on it and add the wheels…
I’ll post the final photos later tonight if I am able to finish it today.
Thanks for the question tracker12, I wasn’t sure what I was going to do today, and your question gave me a good reason to make another car...


") And I am flattered to hear that you like them that much! I do intend to redo my Brookie car one of these days and maybe I’ll make two when I do so I can send one of them your way.
And I am flattered to hear that you like them that much! I do intend to redo my Brookie car one of these days and maybe I’ll make two when I do so I can send one of them your way. 

