F
Fishidiot
Active member
- Joined
- Sep 9, 2006
- Messages
- 9,960
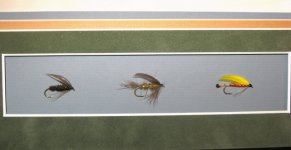
With some recent discussion on the boards about mounting flies and shadowboxes….thought I’d write up a tutorial based on a current project. To be sure, you can certainly take your flies to a professional framer and they can custom cut your frame or, a better approach I think, would be to have them design your frame with mat cut-outs and then you tie the flies to fill the cut-outs and mount them yourself.
Another option is DIY. The example shown with frame and mats cost less than $25 (frame was on sale). A craft store can provide the basic materials. I like Hobby Lobby as they have pre-cut mats and a good range of nice looking frames, often at discount or sale prices. You can use square frames and mats – in this case I chose oval which is a bit more challenging. The mats I used are “suede” but regular paper mats that are pre-cut and sized to fit standardized frames are usually a couple bucks at Hobby Lobby. Although I’m a stickler for acid free mats when framing traditional art, for flies, I don’t bother and use regular, cheapo mats. The fly is a salmon fly I tied: for flies I intend to frame, before I tie the fly I tie/glue unto the shank an “L” shaped heavy wire that protrudes out from the shank at right angles for about a quarter inch (see photo Step 5). This wire allows the fly to be mounted shadow box style in slight elevation over the background creating a nice “floating” affect. This type of frame and shadow box is best suited to flat flies like traditional streamers but smaller flies can be grouped together in mat openings. Let’s get started…..
STEP 1:
You’ll need a frame, mat (in this case a navy blue with oval cut-out that matches the curve of the frame), a background mat for the fly to rest on, some small pieces of foam board or cardboard, some reliable glue (I use Shoegoo or JB Weld), some strong epoxy, and a boxcutter or heavy duty scissors (I like GI medic’s shears – they’ll cut anything).
STEP 2:
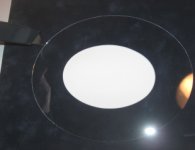
To ensure that your oval opening is centered in your frame, simply place the glass over the mat and adjust it so that the edges are all the same and the mat opening lines up nicely with the glass edge; then mark the mat with a magic marker by tracing around the edge of the glass as a template. In the pic, I’m cutting with a box cutter where you’d mark with the pen. If you’re using a square frame with a mat that already fits, you’ll skip this step (obviously).
STEP 3:
Cut along the line you made with the pen with heavy scissors or boxcutter. Once cut to fit the frame, you may need to do some trimming along the outer edge of the mat. Fit it in the frame and adjust it as necessary so the mat opening lines up with the curve of the frame. Take your time with this step and don’t trim the outer edge too much or it will be too small to fit the frame.
STEP 4:
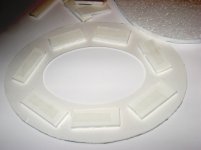
Once you have the mat fitting the frame nicely, turn the mat over and glue several pieces of ¼ inch foam or cardboard along the mat as spacers and allow to dry. Keep these pieces at least about a half inch back from the edge of the opening – if they’re too close, they will be visible when the frame is finished which you don’t want.
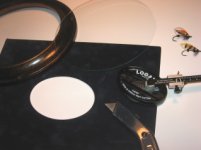
STEP 5:
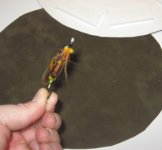
Note the “wire” protruding from the shank of the fly. Hold the fly over the background mat, in this case a piece of brown suede, and mark with a pen where the wire hits the mat. Poke a hole at that spot through the background mat with a pin that makes a hole just big enough to allow the wire to go through. Trim the outer edge of the base mat so that it is slightly smaller than the blue, top mat.
STEP 6:
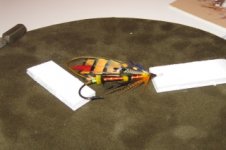
Put a drop of strong, quality epoxy over the hole and a bit on the wire itself and push the wire through the hole. To ensure that the fly “floats,” put a couple pieces of foam under the fly to hold it off the mat while the epoxy dries. I usually put some epoxy on the back side of the mat where the wire protrudes as well. Once dried, snip off any excess wire on the backside.
STEP 7:
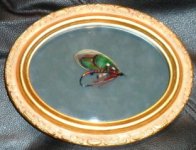
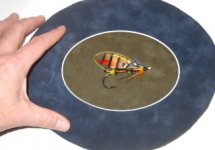
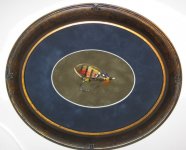
Once your fly has dried and is solidly affixed to the background mat, take the top mat with the oval cut and put some glue on the foam spacers. With the glue tacky, carefully hold the mat over the fly to get the fly centered in the oval opening; then carefully allow the top mat to settle onto the bottom mat so that they glue together. Once dried, carefully clean your piece of glass and fit it in the frame, then put the mats with fly in and close the back of the frame. The last pic shows something like what your finished project should look like.
Another option is DIY. The example shown with frame and mats cost less than $25 (frame was on sale). A craft store can provide the basic materials. I like Hobby Lobby as they have pre-cut mats and a good range of nice looking frames, often at discount or sale prices. You can use square frames and mats – in this case I chose oval which is a bit more challenging. The mats I used are “suede” but regular paper mats that are pre-cut and sized to fit standardized frames are usually a couple bucks at Hobby Lobby. Although I’m a stickler for acid free mats when framing traditional art, for flies, I don’t bother and use regular, cheapo mats. The fly is a salmon fly I tied: for flies I intend to frame, before I tie the fly I tie/glue unto the shank an “L” shaped heavy wire that protrudes out from the shank at right angles for about a quarter inch (see photo Step 5). This wire allows the fly to be mounted shadow box style in slight elevation over the background creating a nice “floating” affect. This type of frame and shadow box is best suited to flat flies like traditional streamers but smaller flies can be grouped together in mat openings. Let’s get started…..
STEP 1:
You’ll need a frame, mat (in this case a navy blue with oval cut-out that matches the curve of the frame), a background mat for the fly to rest on, some small pieces of foam board or cardboard, some reliable glue (I use Shoegoo or JB Weld), some strong epoxy, and a boxcutter or heavy duty scissors (I like GI medic’s shears – they’ll cut anything).
STEP 2:
To ensure that your oval opening is centered in your frame, simply place the glass over the mat and adjust it so that the edges are all the same and the mat opening lines up nicely with the glass edge; then mark the mat with a magic marker by tracing around the edge of the glass as a template. In the pic, I’m cutting with a box cutter where you’d mark with the pen. If you’re using a square frame with a mat that already fits, you’ll skip this step (obviously).
STEP 3:
Cut along the line you made with the pen with heavy scissors or boxcutter. Once cut to fit the frame, you may need to do some trimming along the outer edge of the mat. Fit it in the frame and adjust it as necessary so the mat opening lines up with the curve of the frame. Take your time with this step and don’t trim the outer edge too much or it will be too small to fit the frame.
STEP 4:
Once you have the mat fitting the frame nicely, turn the mat over and glue several pieces of ¼ inch foam or cardboard along the mat as spacers and allow to dry. Keep these pieces at least about a half inch back from the edge of the opening – if they’re too close, they will be visible when the frame is finished which you don’t want.
STEP 5:
Note the “wire” protruding from the shank of the fly. Hold the fly over the background mat, in this case a piece of brown suede, and mark with a pen where the wire hits the mat. Poke a hole at that spot through the background mat with a pin that makes a hole just big enough to allow the wire to go through. Trim the outer edge of the base mat so that it is slightly smaller than the blue, top mat.
STEP 6:
Put a drop of strong, quality epoxy over the hole and a bit on the wire itself and push the wire through the hole. To ensure that the fly “floats,” put a couple pieces of foam under the fly to hold it off the mat while the epoxy dries. I usually put some epoxy on the back side of the mat where the wire protrudes as well. Once dried, snip off any excess wire on the backside.
STEP 7:
Once your fly has dried and is solidly affixed to the background mat, take the top mat with the oval cut and put some glue on the foam spacers. With the glue tacky, carefully hold the mat over the fly to get the fly centered in the oval opening; then carefully allow the top mat to settle onto the bottom mat so that they glue together. Once dried, carefully clean your piece of glass and fit it in the frame, then put the mats with fly in and close the back of the frame. The last pic shows something like what your finished project should look like.

")