Got the bug

Out4Trout

Out4Trout

Member
Joined
Nov 29, 2017
Messages
182
Well thanks to this forum, I have started tying my own flies. I have been fly fishing for the better part of 15 years now so its about time. With my disability I cant sit at the vise for a long time but long enough here and there to get some tying done. The 1st fly I focused on was the wooly bugger and after about 12 attempts, I managed to get one that seemed fishable.

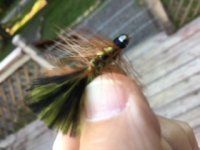
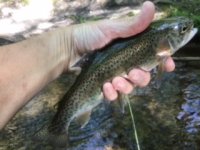
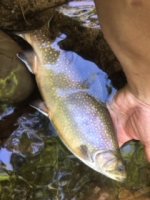
Today I went out to give it a try and caught quite a few on my 1st fly. Pictures below is the 1st one and then a beaut of a brookie I caught.

Few lessons learned are I need to not make the thread so big around the head and I need to use head cement as I tried just doing a hand whip finish, but after a few fish I noticed the thread coming apart and unraveling.

Tight Lines
 

Attachments

  • IMG_1318.JPG
    IMG_1318.JPG
    28.4 KB · Views: 11
  • IMG_1319.JPG
    IMG_1319.JPG
    36.5 KB · Views: 5
  • IMG_1324.jpg
    IMG_1324.jpg
    37.5 KB · Views: 5
Good job!

I recommend head cement. Make sure that, after you apply it, you take a moment to poke a needle or hook point into the eye of the fly you just tied. This will clear any cement that might have dried and sealed off your hook eye.
 
Nicely done! Really neat to have a photo of your first one on your own fly. Keep up the good work.
 
Congrats. SAVE THAT FLY. Its a great momento.

"Few lessons learned are I need to not make the thread so big around the head"

A little trick about the collar that may help you if I may.

When I teach fly tying I see a lot of novices do exactly what you have done, create a large head or in your case, collar, on flies.

I see that you used a bead. What happens is that when you wrap the body up to the bead, the diameter of the body at the tie off point looks sort of like this >O. (>is body, O is Bead) You have a very narrow tie off point, hence the tendency to buildup the area with thread.

May I suggest after placing the bead, add a few wraps of lead wire and shove it into the bead from the rear. About 3-5 wraps are plenty and it adds a tad more weight. You may add as many as you wish depending on size and how much sink you prefer. The key being to add enough to hold bead in place and to build up the collar area at the tie off point so you can minimize wraps and create a neat collar.

It should look something like this ----=O. The = sign is the lead wrap into and behind the bead "O". ---- is the hook shank.

You are on your way.
 
sally hanson's hard as nails (nail polish) is fine as head cement. costs about a dollar.
 
i hit the junk jewelry teenie bopper store in the mall when I need paint and clear coat for cork/foam bass poppers. lots of colors and its about a buck a bottle. comes with a brush.

BTW, nice bugger. If you see any damsel flies, that's a great fly to fish.
 
falcon wrote:
a dollar??? where is it a dollar?

i buy it for a dollar at dollar general.
 
also , OP
since you know how to tye a bugger,it would be easy for you to tye a wooly worm. a wooly worm is a great fly,you could fish for the rest of your life
 
Back
Top