Clayton Peter's Perla Nymph

R

riverwhy

Active member
Joined
Jan 5, 2007
Messages
577
Anyone have the recipe? I saw an old post and a link on this but the link doesn't work. Apparently they took down the older PA Angler issues. I once had a photo copy of this article given to me by an older gentleman on the stream. That was probably 35 years ago. Unfortunately, I lost it but would love to tie it up since I am going up to Penn's in a few days. Thanks for any link or recipe you can provide. I did find a YouTube video on how to do the woven body portion.
Thanks, in advance!!
 
I'm sure the guys at Fly Fisher's Paradise can give you a recipe: http://www.flyfishersparadise.com/
 
originally it was in the april 1973 pennsylvania angler which has been removed from the legacy issues

https://www.fishandboat.com/Transact/AnglerBoater/LegacyIssues/1970s/Pages/default.aspx

it is somewhat described in the sept 1978 pennsylvania angler

stonefly.jpg


https://www.fishandboat.com/Transact/AnglerBoater/LegacyIssues/1970s/Documents/09september1978.pdf

i would think that a woven stonefly with a brown back and yellow belly should be a good substitute for the fly in question

this might work (from flyfishers paradise shop)

WN30-2.jpg


another thread

http://www.paflyfish.com/forums/Open-Forums/Fly-Tying/Clayton-Peter--039-s-woven-perla-stonefly-nymph/5,36775.html
 
Thanks for the articles and photos. At first I thought this PA Angler article was the one. But then I realized it was missing a couple things. There was a reference to a member of the Lykens camp sifting nymphs by his camp. I think now this article may have been about Peters written by lively. It probably from the earlier addition that is no longer available. Also, it included the fly recipe. A couple questions:
1. What would you use for tails and antennae? Goose biots? I think the antennae are actually longer than the tails.
2. I seem to remember the use of a strip of aluminum to get the flat body profile but don't remember how to attach it. I think when I tied the fly in the past I just used lead and flattened it somewhat with pliers. Do you think the flat profile is needed. I remember reading about an older western tier saying you should just tie patterns "in the round" and he didn't advocate trying to get the top one shade and the body another?
Any thoughts?
 
If you give me your email, I can send you a copy of the article.
I don’t have the original publication, but I have an old photocopy of the article that a friend of mine gave to me many years ago. Unfortunately, the copy that I have doesn’t include the date of the PA Angler magazine that the article appeared in (you can find these old publications from time to time for sale on eBay) and the pictures aren’t very clear in my copy, but you should be able to read the rest of the article.

It is a pretty generic stone fly pattern, IMO, but it does have a nice woven floss body - yellow underneath and brown on top - so it is a good stone fly imitation.

I’ve tied and used that pattern and caught some nice fish on it over the years, including a very nice brown on the Cairn’s Pool of the Beaverkill one warm, sunny mid-June morning at least 30 years ago. I recently posted a picture of me with that brown on another fly fishing website. I believe the brown was about 26-28” long.

John
 
PM sent. Thanks so much for sharing. Do you tie the antennae on? Extra step and is makes it a little more tying it on the leader.
 
I sent you an email.

I haven’t always tied on the antennae, and I don’t think it matters one way or the other. I’ve also often used stripped goose quill for both the legs and tail, which I thing looks better. In the past, I’ve soaked my floss in dish soap in advance, and let it dry before weaving the body because I found it was easier for me to weave the floss that way. I suppose some people would probably say that the smell of dish soap would turn off the fish to the fly, and maybe it does for a time until the soap smells wears off.

John
 
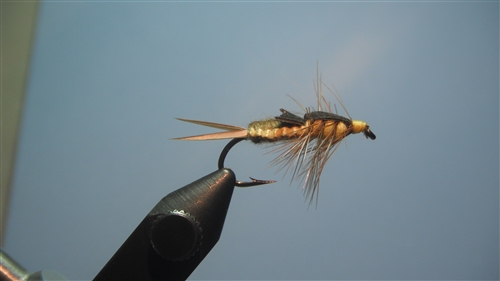
Here is the pattern I tie.

WOVEN PERLA STONEFLY NYMPH

MATERIALS
1. Size 8 - 12 nymph hook
2. Thread yellow
3. Underbody – Heavy lead wire
4. Antennae – Tan Goose biots
5. Tail – Tan Goose biots
6. Abdomen – Floss DMC 727 yellow and 898 or 433 Brown
7. Wing case – V-clipped turkey tail quill or mottled thin skin wing case materiel
8. Thorax – Mixture of Hareline dubbing yellow #8 and #9
9. Legs – Brown saddle hackle palmered through thorax.

INSTRUCTIONS
1. Crimp the barb and place the hook in the vice.
2. Attach the thread along the entire hook shank.
3. Attach lead wire at the front of the hook and wrap the lead in tight spirals ¾ the length of the hook shank. Make sure you leave room at the eye.
4. Wrap thread back and forth along the lead wrapping. Leave the thread at the rear of the hook. When complete, use a pair of needle nose pliers to flatten the lead. This will give the fly the appropriate flat body shape. Another option is to tie in a lead strand on each side of the hook. In this method, you will not need to flatten the lead. In either style, use the thread to make a nice taper at the end of the lead to the rear of the hook.
5. Attach two goose biots, split for the tail.
6. Cut a 6” piece of each the yellow and brown floss. The floss has 6 strands. Separate the floss into a 3 strands. Tie one yellow section of 3 stranded floss to one side of the hook and one brown section of 3 stranded floss to the opposite side of the hook, beginning at the thorax level to the bend of the hook.
7. Weave the floss as follows: Always keep the brown floss on top of the hook and the yellow floss on the bottom of the hook.
• Make a horizontal loop with the brown floss on the side it was attached and extend the tag end over the top of the hook. The tag end will extend over the hook shank and (on top) over the attached yellow floss.
• Take the yellow floss over the tag end of the brown floss and underneath the hook shank, and up through the horizontal loop formed with the brown floss.
• Pull tight with even pressure on both sections of floss. The first weave is complete. The floss colors are now on opposite sides of the hook shank.
• Repeat the exact same process in the opposite direction. ALWAYS keep the brown floss on top and the yellow on the bottom.
• Continue the process until the lead is covered and tie off the floss.
8. Tie in the wing case material at the thorax site. This fly has two wing cases. The wing case is tied in with a tag end towards the hook bend and a tag end towards the eye of the hook. Trim a “V” shape into the rear section of the wing case.
9. Tie in a brown hackle feather to match the size of the hook.
10. Dub the thorax.
11. Attach two goose biots, split for the antennae, on top of the hook and tie off.
12. Wrap the hackle feather forward through the thorax and tie off.
13. Pull the wing case over the hackle and tie off.
14. If thin skin is used as a wing case material, color with a brown sharpie marker to produce a gloss wing case. If you have not address the shape of the rear wing case, trim a “V” shape into this section of the wing case.

Flytying\Woven Perla Stonefly Nymph

 
Back
Top